Pythonの開発環境にはいくつか選択肢がありますが、まず私は手軽に始められる
Google Colaboratory(Colab)を使っています。
本記事では、Googleアカウント・Google Driveの準備から、Colabを使ってPythonを実行する方法を画像付きで解説します。
私自身まだ勉強中ですが、これから始める方の参考になれば嬉しいです。
【体験談】最初は環境構築にすごく時間がかかると思い込んでいたのですが、Colabなら本当に5分でPythonを動かせて驚きました。
Pythonを始めるには「Google Colab」「Anaconda(Jupyter Notebook)」「直接インストール」の3つの主な方法があります。
ちなみに、私自身、最初はどれを使えばいいか迷ったので、同じような方の参考になればと思いまとめてみました。
【失敗談】Anacondaをインストールしたものの、容量が大きすぎてPCが重くなり、結局Colabに乗り換えました。
※ なお、初心者向けに補足も入れています。
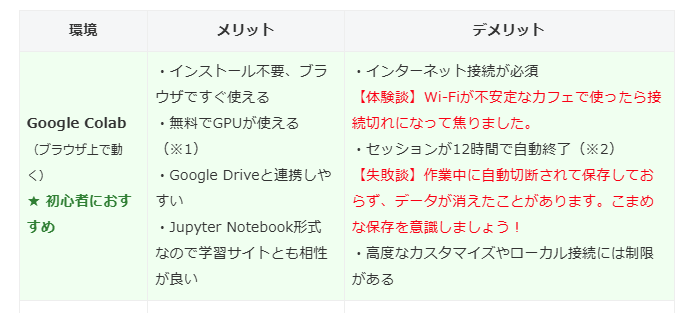
| 環境 | メリット | デメリット |
|---|---|---|
| Google Colab (ブラウザ上で動く) ★ 初心者におすすめ |
・インストール不要、ブラウザですぐ使える ・無料でGPUが使える(※1) ・Google Driveと連携しやすい ・Jupyter Notebook形式なので学習サイトとも相性が良い |
・インターネット接続が必須 【体験談】Wi-Fiが不安定なカフェで使ったら接続切れになって焦りました。 ・セッションが12時間で自動終了(※2) 【失敗談】作業中に自動切断されて保存しておらず、データが消えたことがあります。こまめな保存を意識しましょう! ・高度なカスタマイズやローカル接続には制限がある |
| Anaconda(Jupyter) (PCにインストール) |
・豊富なライブラリが最初から入っている ・オフラインでも使える ・仮想環境(env)をGUIで簡単に管理できる |
・初回インストール容量が大きい(3〜5GB) 【体験談】インストールに1時間以上かかって驚きました。ストレージに注意です。 ・PCの性能に依存(特にGPUを使う処理) ・不要な環境を残すとディスク容量を消費しやすい |
| 直接インストール (公式Pythonから) |
・最小構成で軽量、必要なものだけ導入可能 ・開発環境の柔軟なカスタマイズが可能 ・エンジニア向けの本格的な環境構築ができる |
・初心者にはやや難易度が高い(※3) ・仮想環境の知識が必要(venvやpyenvなど) ・ライブラリ管理やトラブル対処がすべて自己責任 |
※1: Colabの無料版でも「ランタイムの変更」でGPUが使えますが、利用時間に制限があります。
※2: セッションは一定時間で自動切断されるため、大規模な処理には向きません(Pro版で延長可能)。
※3: Pythonやパソコンの仕組みに慣れている方向けの構成です。初心者はColabまたはAnacondaがおすすめです。
Google Colabの使い方(ステップ形式で解説)
ステップ①:Googleアカウントを取得
Google Colabを利用するには、Googleアカウントが必要です。まだ持っていない方は
こちらから作成してください。
【体験談】私は学習専用のサブアカウントを作ったところ、データ管理が非常に楽になりました。
ステップ②:Google Driveにアクセス
Colabノートブックの保存先となる
Google Drive
にログインします。

ステップ③:Google DriveからColabを起動
Google Driveの「+新規」→「その他」→「Google Colaboratory」を選びます。
【失敗談】最初Colabが表示されず戸惑いましたが、拡張機能追加で簡単に出せました!

ステップ④:Colabノートブックの操作画面
Colabを起動するとノートブック形式の編集画面が出ます。セルにコードを入力してすぐ実行できます。
ステップ⑤:Pythonコードを実行してみる
セルに1 + 1と入力して「Shift + Enter」を押すと、下に2と表示されます。
【体験談】たった「1+1」が表示されただけでも、自分の手でPythonを動かせた感動を今でも覚えています。

ステップ⑥:データ分析や学習用途に活用しよう
ColabはJupyter互換なので、pandasやNumPyなどもすぐ使えます。
【失敗談】ライブラリインポートを忘れてエラー連発したので、必ずimport文を書くクセをつけましょう。
🔰 pandas・NumPyとは?(初心者向け補足)
Pythonでデータ分析を行うときによく使われるのが、pandasとNumPyというライブラリです。
ここでは初心者の方に向けて、それぞれの役割を簡単に紹介します。
- pandas(パンダス):
表形式(Excelのような行と列)のデータを扱うためのライブラリです。
データの読み込み・加工・集計・フィルタリングなどが簡単に行えます。
例:CSVファイルを読み込んで、必要な行だけ抽出する - NumPy(ナンパイ):
数値計算に特化したライブラリで、ベクトルや行列といった数学的なデータ処理を高速に行えます。
pandasの内部でもNumPyが使われており、データ分析の土台となる重要なツールです。
例:大量の数値データを使った統計処理や機械学習の基礎
Google Colabでは、次のようにライブラリをインポートして使い始めます。
import pandas as pd
import numpy as npこのコードは、それぞれのライブラリにpdやnpという省略名をつけて使いやすくするための書き方です。
ほとんどのチュートリアルや学習書籍でもこの形式が使われています。
「まだよくわからない」と感じても心配ありません。
まずは「よく出てくる名前」くらいの認識で十分です。
これらのライブラリについては、今後の記事で詳しく取り上げる予定です。
✅ まとめ
- Pythonの実行環境にはColab・Anaconda・直接インストールの3つの選択肢があります
- Google Colabはブラウザだけで使える手軽さが魅力で、初心者に特におすすめ
- Anacondaは本格的な分析・開発環境構築向け
- 直接インストールは自由度が高い分、やや中上級者向け
- まずはColabで成功体験を積み、その後他の環境にステップアップしましょう
【まとめ体験談】最初は不安でもColabを使ったおかげで、Python学習のハードルがぐっと下がりました。
コメント