Pandas CSV 入門の記事では、Google Colab と Google Drive で、CSV ファイルの読み込み方法と保存方法を、初心者向けにステップバイステップで解説します。 具体的には、以下のような悩みを持つ初心者の方へ向けています。
- Google Colab と Drive で pandas を使った CSV ファイルの読み込みと保存
- ステップ①|drive.mount() で Google Drive を Colab に接続
- ステップ②|pd.read_csv() で Drive 上の CSV を読み込む
- ステップ③|df.to_csv() で 編集結果を Drive に保存
Google Colab と Drive で pandas を使った CSV ファイルの読み込みと保存
この記事では、Google ColabとGoogle Driveを連携させ、以下の方法を実際のコードと共にご紹介します。
- Google DriveをColabに接続する方法
- Google Drive上のCSVファイルをpandasのread_csv()で読み込む方法
- Colabで作成したデータをpandasのto_csv()でCSVファイルとして保存する方法
前回の記事(【初心者向け】Pythonの実行環境を比較!Colab・Anaconda・インストールの違いと使い方)でGoogle Colabの基本的な使い方はわかったと思います。今回は、データ分析でよく使うGoogle Driveとの連携に焦点を当て、快適なデータ分析環境の構築を目指しましょう。
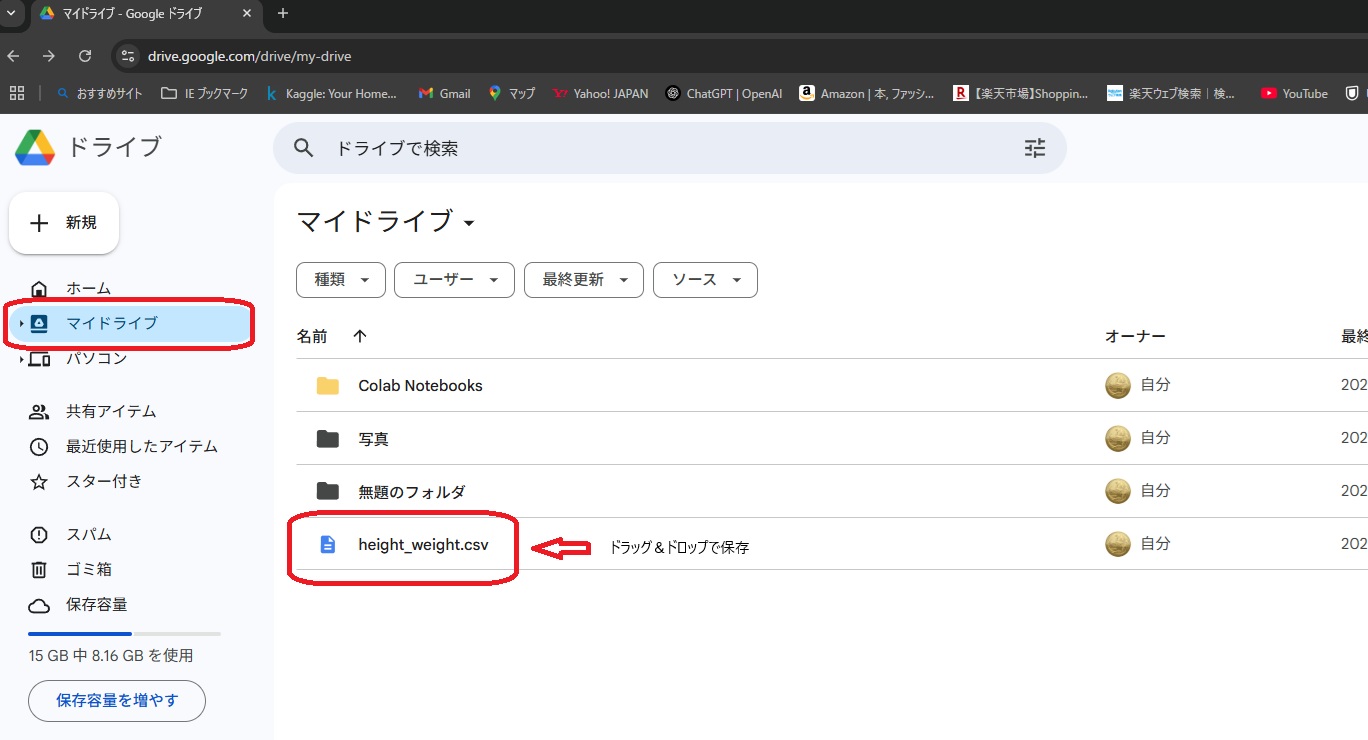
例として、Google Drive(マイドライブ)に保存した height_weight.csv というCSVファイルをColabから読み込むケースを想定して解説を進めます。事前に、お手持ちのCSVファイルをGoogle Driveのマイドライブにドラッグ&ドロップして保存しておいてください。
ステップ①|drive.mount() で Google Drive を Colab に接続
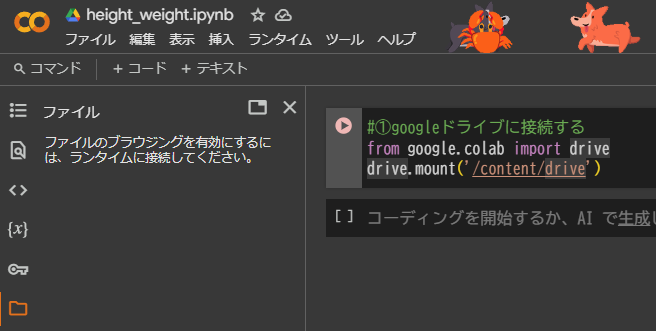
まず最初に、ColabからGoogle Driveにアクセスできるように接続設定を行います。以下のコードを実行(Shift + Enter)してください。
from google.colab import drive
drive.mount('/content/drive')
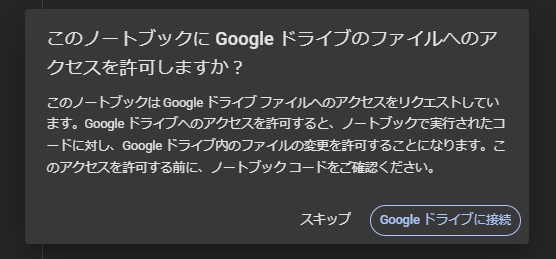
ColabからGoogle Drive内のファイルにアクセスできるようになります。「このノートブックにGoogleドライブのファイルへのアクセスを許可しますか?」と表示されたら、「Googleドライブに接続」をクリックしてください。その後、アカウントの選択などが表示されますが、指示通りに進めてください。認証が完了すると、「Mounted at /content/drive」のようなメッセージが表示され、Google Drive が Colab にマウントされた状態になります。
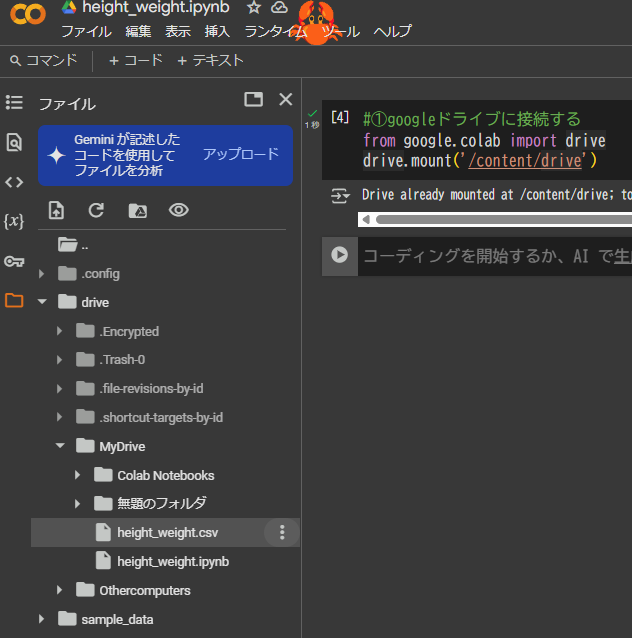
本当にGoogle Driveが見えるようになったか、確認してみましょう!
Colabの画面の左側にある、フォルダの形をしたアイコンをクリックしてみてください。
クリックすると、左側にファイルの一覧が表示されます。その中に、「drive」というフォルダが見えれば成功です!
ステップ②|pd.read_csv() で Drive 上の CSV を読み込む
google DriveをColabに接続できたので、次に、CSVファイルをColabに読み込んで、Pythonで使えるようにしましょう。
CSVファイルを読み込むには、「pandas(パンダス)」という、データ分析でよく使われる便利なツール(ライブラリ)を使います。
pandasを使えるようにするコード
import pandas as pd
上のコードは、「pandasというツールを使えるようにして、『pd』という短い名前で呼べるようにしますよ」という意味です。データ分析では、pdという名前でpandasを使うのがお決まりなので覚えておくと便利です。
CSV ファイルパスの確認方法
次に、Colabに「どのCSVファイルを読み込みたいの?」というのを教えてあげる必要があります。そのファイルの場所を示すのが「ファイルパス」です。
ファイルパスは、Google Driveがマウントされている場所(/content/drive/MyDrive/)から始めます。CSVファイルまでのフォルダの名前とファイル名をスラッシュ(/)で繋げて書いてください。
例えば、あなたのGoogle Driveの「マイドライブ」の中の「データ」というフォルダに、「height_weight.csv」というCSVファイルが保存されているとします。
その場合のファイルパスは、
/content/drive/MyDrive/height_weight.csv
となります。
💡 ファイルパスを正確に入力するには
一番簡単な方法は、Colabのファイル一覧からパスをコピーすることです。
- Colabの左側のファイルアイコンをクリックして、Google Driveのフォルダ(drive → MyDrive)を開きます。
- 読み込みたいCSVファイル(ここでは height_weight.csv)の上で右クリックします。
- 表示されるメニューの中から「パスをコピー」を選びます。
CSVファイルを読み込むコード (pd.read_csv)
ファイルパスが分かったら、いよいよコードで読み込みます。
例として、上で説明したファイルパスを使います。あなたのファイルパスに置き換えてください。
pandasを使ってCSVファイルを読み込み、’df’という名前にします
df = pd.read_csv('/content/drive/MyDrive/height_weight.csv')
上のコードは、「指定した場所にあるCSVファイルを読み込んで、その中身を『df』(データフレーム)という名前で使えるようにします」という意味です。ちなみに、height_weight.csvは、名前・身長(cm)・体重(kg)の3列のデータです。
【失敗談①】私自身、最初はファイルパスを正しく指定できず、何度も”No such file or directory”というエラーに悩まされました。Google Drive上で右クリックして「パスをコピー」することで、確実に正しいパスを貼り付けられると気付き、エラーが解決しました。
【失敗談②】パスの最初と最後は「”」または「””」を書く必要があります。これを忘れて読み込めないということが何度もありました。
▶️ read_csvの公式ドキュメントも参考にしてください:
pandas read_csv Documentation
CSVファイルの読み込みがうまくいったか確認してみよう!
df
| Name | Height(cm) | Weight(kg) | |
|---|---|---|---|
| 0 | NQjXU | 152 | 53 |
| 1 | rcXej | 165 | 51 |
| 2 | FMtIp | 188 | 56 |
| 3 | gymZI | 183 | 64 |
| 4 | BqzCl | 150 | 81 |
| … | … | … | … |
| 95 | mFXFW | 150 | 51 |
| 96 | iZnKV | 153 | 48 |
| 97 | khNpD | 164 | 80 |
| 98 | SYbsz | 162 | 76 |
| 99 | dETwq | 176 | 79 |
補足①:df.head()でデータの先頭を確認
df.head():読み込んだデータ(df)の最初の数行が表示されます。これで、データが正しく読み込まれているか確認できます。
df.head()
| Name | Height(cm) | Weight(kg) | |
|---|---|---|---|
| 0 | NQjXU | 152 | 53 |
| 1 | rcXej | 165 | 51 |
| 2 | FMtIp | 188 | 56 |
| 3 | gymZI | 183 | 64 |
| 4 | BqzCl | 150 | 81 |
詳しい使い方はこちらの記事をご覧ください。
【初心者向け】Pandasのhead関数の使い方とDataFrameの先頭行を表示する具体的手順を解説
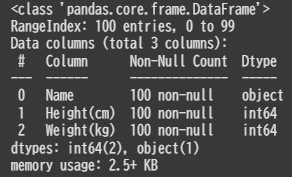
補足②:df.info(),df.describe()で基本情報と統計量を確認
df.info():読み込んだデータ(df)のデータの型や欠損値などの基本情報を表示したい場合
df.info()
df.describe():読み込んだデータ(df)のデータの統計量(平均値、最大値など)を表示したい場合
df.describe()
| Height(cm) | Weight(kg) | |
|---|---|---|
| count | 100.000000 | 100.000000 |
| mean | 173.110000 | 70.960000 |
| std | 16.084936 | 16.403941 |
| min | 150.000000 | 45.000000 |
| 25% | 160.000000 | 58.000000 |
| 50% | 171.500000 | 69.000000 |
| 75% | 188.000000 | 85.250000 |
| max | 200.000000 | 100.000000 |
詳しい使い方はこちらの記事をご覧ください。
【初心者向け】Pandasのinfo()・describe()でデータ構造と統計量をやさしく理解する方法
CSV読み込み時のよくあるエラーと対処法(FileNotFound ほか)
CSVファイルの読み込みでは、いくつか『あるある』なエラーがあります。エラーが出ても大丈夫!落ち着いて確認してみましょう。
エラー1:「FileNotFoundError: [Errno 2] No such file or directory: ‘…’」-ファイルが見つからない
- どんなエラー?:指定した場所にファイルが見つからない、というエラーです。
- 原因は?:一番多い原因は、ファイルパスの間違いです。ファイル名の大文字・小文字が違う、フォルダ名が違う、スラッシュ(/)が足りない・多い、といったことが考えられます。Google DriveがColabにうまくマウントできていない場合にも起こります。
- どうすればいい?:
- ファイルパスをもう一度確認: Colabのファイルアイコンから「パスをコピー」機能を使って、正確なパスを貼り付け直してみてください。
- Google Driveのマウント確認: ステップ①のコードをもう一度実行して、マウントが成功しているか確認してみてください。
エラー2:読み込めたけど、文字が変になった!(文字化け)-encordingの設定
- どんなエラー?:データは読み込めたみたいだけど、「????」や「???」のように文字が変になってしまっている状態です。
- 原因は?:CSVファイルの「文字コード」(文字のルールのようなもの)が、Colabが自動で判断したものと違う場合に起こります。
- どうすればいい?:
pd.read_csv()にencodingという設定を追加します。df = pd.read_csv(csv_file_path, encoding='utf-8')まず最初にこれを試してみましょう- もしうまくいかなければ、
encoding='shift_jis'やencoding='cp932'など、他の文字コードを試してみてください。(特に日本のWindowsで作成したCSVファイルでよく使われます)
エラー3:データがぐちゃぐちゃになった!区切りが変…-delimiter/seqの指定
- どんなエラー?:CSVファイルなのに、データがきちんと列に分かれずに、一つの列に全部入ってしまっているような状態です。
- 原因は?:CSVファイルは通常カンマ(,)で区切られていますが、中にはタブやセミコロン(;)など、カンマ以外の文字で区切られている場合があります。
pd.read_csv()はデフォルトでカンマ区切りだと思っています。 - どうすればいい?:
pd.read_csv()にdelimiterまたはsepという設定を追加します。- 例えば、タブで区切られている場合は
df = pd.read_csv(csv_file_path, delimiter='\t') - セミコロンで区切られている場合は
df = pd.read_csv(csv_file_path, delimiter=';')
- 例えば、タブで区切られている場合は
ステップ③|df.to_csv() で 編集結果を Drive に保存
colabでデータを分析したり、不要な行や列を削除したり、新しい計算結果を加えたり…といった加工をしたとします。(今回は例として、読み込んだそのままのデータを保存します)
加工したデータをCSVファイル(例:height_weight2.csv)としてGoogle Driveに保存するには、df.to_csv() という機能を使います。
保存したい場所は、’/content/drive/MyDrive/’に保存する場合のコードは以下になります。
df.to_csv('/content/drive/MyDrive/height_weight2.csv',index=False)
上のコードは、「データフレーム(df)の中身を、指定したファイルパスにCSVファイルとして保存しますよ。その際に、左側のインデックスという番号は含めませんよ(index=False)」という意味です。
保存がうまくいったか確認してみよう!
指定した場所に新しいCSVファイルができているか、Google Driveの画面やColabのファイル一覧で確認してみてください。
to_csv()で保存時に注意しておきたいこと
ファイルパス: 読み込みと同じで、保存したい場所のファイルパスを正確に指定することが重要です。 ファイル名: すでに同じ名前のファイルがあると、新しいデータで上書きされてしまいます。大切なファイルの場合は、新しいファイル名で保存することをおすすめします。
index=Falseの指定
これをしないと、保存したCSVファイルの左端に連番の列ができてしまいます。次にこのファイルを読み込む際に、この番号が不要な列として扱われてしまうことがあるので、通常は index=False を付けて保存します。
▶️ tocsvの公式ドキュメントも参考にしてください: pandas DataFrame tocsv Documentation
✅ まとめ:Google Colab と Drive で CSV を読み書きする方法
本記事では、Google Colab で Google Drive と連携して CSV ファイルを読み書きする方法を解説しました。
- drive.mount() でGoogle DriveをColabに接続
- import pandas as pd でpandasを使えるようにする
- ファイルパスを調べて、pd.read_csv() でCSVファイルを読み込む
- df.to_csv() で編集したデータをCSVファイルとして保存する
これらの手順を理解しておけば、Colab を使ったデータ分析の幅が大きく広がります。 初めての方はうまくいかない場合もあるかもしれませんが、焦らずひとつずつ試してみてくださいね。継続が一番の上達のコツです。ぜひ、ご自身のデータで試してみてください。
応用例:他のファイル形式の扱い
pandas ライブラリは、CSV 形式だけでなく、Excel(.xlsx, .xls)、JSON、HTML など、様々なファイル形式の読み書きに対応しています。
例えば、Excel ファイルを読み込む場合は pd.readexcel()、Excel ファイルとして保存する場合は DataFrame.toexcel() を使用します。基本的な使い方は pd.readcsv() や DataFrame.tocsv() と似ています。
これらの関数を Google Drive と連携して使用することで、Google Drive 上の様々な形式のファイルを Colab で扱えます。処理結果を元の形式や別の形式で保存することが可能になります。
- QFileNotFoundErrorになる場合は?
- A
ファイルパスをもう一度確認: Colabのファイルアイコンから「パスをコピー」機能を使って、正確なパスを貼り付け直してみてください。
Google Driveのマウント確認: ステップ①のコードをもう一度実行して、マウントが成功しているか確認してみてください。
- Q読み込めたけど、文字が変になった場合は?
- A
df = pd.read_csv(csv_file_path, encoding='utf-8')まず最初にこれを試してみましょう- もしうまくいかなければ、
encoding='shift_jis'やencoding='cp932'など、他の文字コードを試してみてください。(特に日本のWindowsで作成したCSVファイルでよく使われます)
- Q区切り文字がタブやセミコロンの場合は?
- A
どうすればいい?:
pd.read_csv()にdelimiterまたはsepという設定を追加します。
タブで区切られている場合はdf = pd.read_csv(csv_file_path, delimiter='\t')
セミコロンで区切られている場合はdf = pd.read_csv(csv_file_path, delimiter=';')
コメント